Adding/Editing meeting minutes
Adding meeting minutes
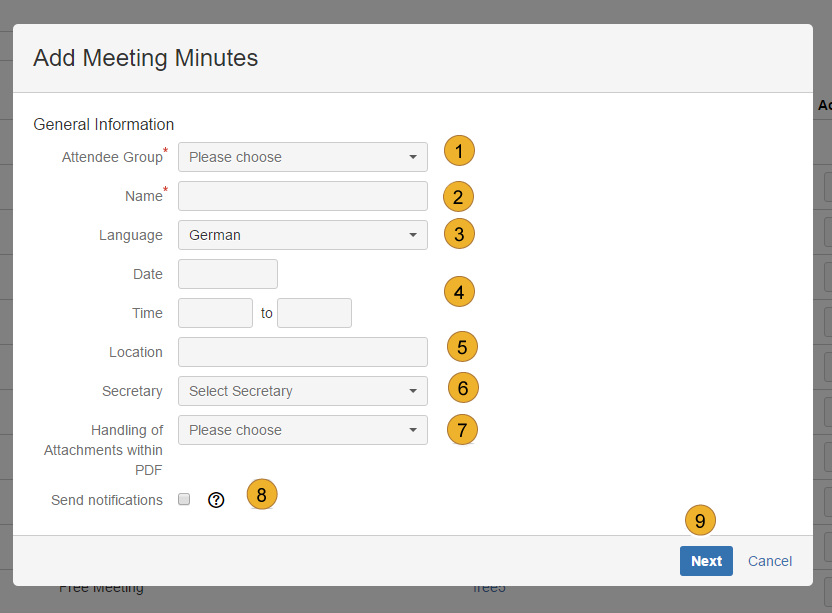
If you want to create a new meeting minutes, choose „View Meeting minutes“ in the sub-menu „Meeting Minutes“ 1. You will get a screen with an overview of all meeting minutes. To add a new meeting minutes, click the button „+ Add meeting minutes“ 2. At first you can choose between an attendee group and a free meeting. Attendee Groups are not necessary for free meetings.Now you can set the „General Information“. Like Attendee Group 1, Name 2, Language 3, Date and Time 4, Location 5 and the Secretary 6. Furthermore you are able to choose the handling of attachments within PDF 7. Sending a notification 8 after closing the minutes to all internal and external participants is possible as well. All data of your created attendee group (time, place, participants and so on) will be delegated to the meeting minutes. In case you create a free meeting you have to add these information separately. In the secretary pulldown menu only users assigned to the meeting secretary role within the current project are shown.
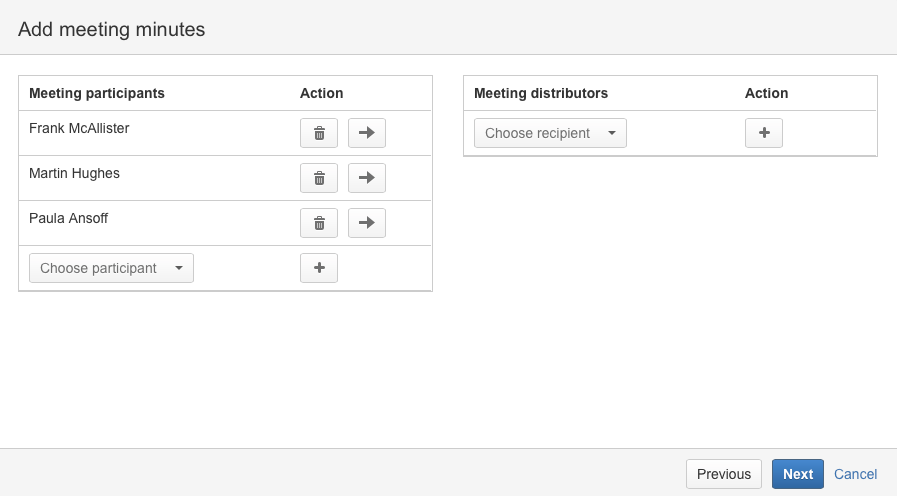
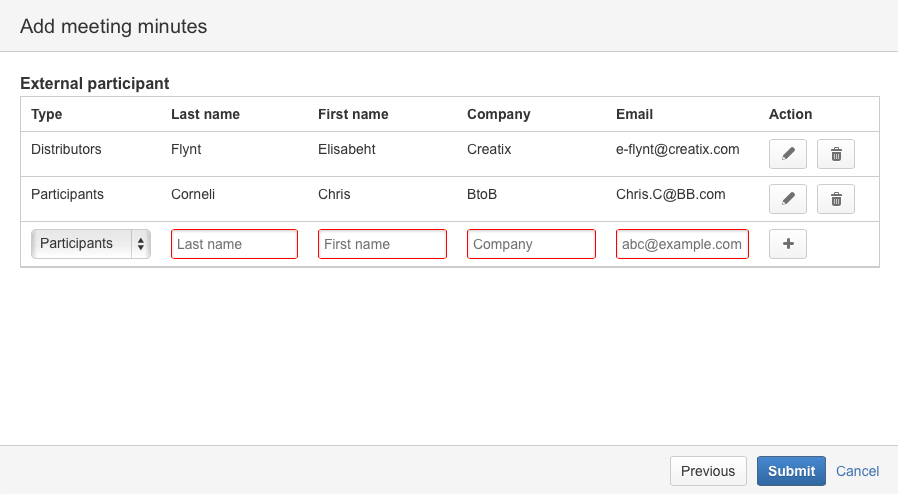
Click “Next” 9 to proceed.Adding of meeting participants, meeting distributors and external participants happens in the same way as adding of participants and standard distributors to the attendee group. Click “Submit” to finish creating of new meeting minutes.
The new meeting minutes is now saved and appears in the list where it can be further edited. To edit meeting minutes press the “Pencil”-button 1 which you can see in the right part of the list.

Editing meeting minutes
On the following screen you can edit the Data of your meeting minutes in the registers “Meta data”, “Topics” and “Attachments”. In the register “Meta data” there is a possibility to edit all the data which have been defined in the process of creating the meeting minutes e.g. Name, Attendee group and Language.
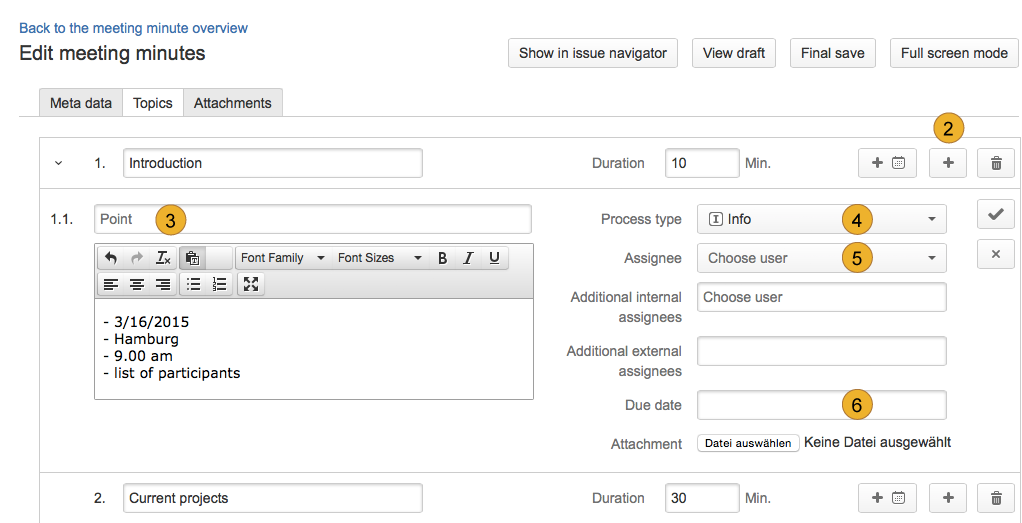
In the register “Topics” you can manage the minutes of the selected meeting. You can add topics by pressing the “Add issue”-button 1.

Now you should see a form where you can edit a topic. By pressing the “Plus”-button 2 you can add “Points” to the current topic. Clicking the “Bucket”-button 3 deletes the selected topic. There is a possibility to add a description to the topic, as well as to specify other information like Process type 4, Assignee 5, Due date 6 and so on. See the specification of Process types below. Furthermore rearranging topics and subitems can be done via a Drop-Down-menu. So subitems can be reassigned easily to an other topic. In the assignee drop-down menus you can see all members of the current project onwing the assignance permission which means they have an administrator or developer role or are members of administrator or developer groups.
 If an encrypted attachment gets uploaded the warn message above 11 gets displayed indicating that the mentioned file gets linked within the minutes no matter if something else is defined in the meeting settings.
Meeting issues will only be exported by the time the whole meeting is finished. Furthermore the export occurs only for the issues having an process type that were connected to a JIRA issue type within the project settings.
The Process types you can choose from are “Info”, “Draft”, “Appointment” and “Task”. Depending on the Process type which you choose for the topic there are different “required fields”.
After finishing creating of a Topic click on the “Tick”-button to proceed. If every topic is created and process types are referred you just have to click on the “Final save”-button 1 and confirm with „Yes“. Now your meeting minutes is created and a PDF-File is available. Further information can be found on Finishing meeting minutes (PDF Export). Other topics of documentation
- Customize User Properties
- User administration
- Disable and uninstall of AgileMinutes
- FAQ
- Installation of AgileMinutes
- JIRA-Default Issue Types
- Navigation / Overview Menus
- Meeting Minute PDF export example
- Meeting Management Overview
- Finishing meeting minutes (PDF Export)
- Add meeting minutes – Free Meeting
- Adding/Editing meeting minutes
- Delete meeting minutes
- Meeting minutes settings (PDF)
- Edit/Delete Attendee Groups
- Add Attendee Groups
- Adding meeting minutes refrences to issues
- User rights management
- Upgrade Anleitung 6.4.x to JIRA 7.x.x
- Versionhistory
- Issue Types / project settings


